User’s manual
In this chapter:
This chapter explains how data can be imported from csv files into Instant Team. In particular, it focuses on the definition of new import rules which is available to Professional license level users only.
The application allows imports of data from projects processed in MS Project, as described in Chapter 3 above, but other records can also be imported into the separate databases.
You will learn in detail here what steps are required for the import, namely how to prepare a user-defined formula to import any data into any of the databases.
Import preparation
Any data stored elsewhere in a structured form which you want to use in Instant Team can be imported into the application.
In Chapter 3 we have described how to use a predefined import formula to import project tasks from MS Project. This functionality is available to all users.
To be able to create your own import formulas and import thus arbitrary data, you need to use the application on the Professional license level and you must have the right to create/modify/delete records in the database where you will import data. You will then find the New… option in the Import sub-menu of the Record menu, which you will use to import the data.
As a Professional license holder you can also follow the instructions below to modify the MS Project import formula in order to meet your specific requirements.
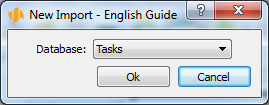
Selecting the database
Every import file must contain future records of one particular database only. That is why the first step in import preparation is database selection.
Selecting the import file
After selecting the database a window is opened with the import definition itself. The window is similar to that of MS Project import described above in Chapter 3.
The import file and the import formula according to which the records should be imported are specified in this window.
In the upper part of the window select the file with records to be imported, specifying the path directly or using the Select… button to browse your directory. The window is then divided into several tabs.
Columns
In the Columns tab, you define the structure of the file, that is, how many columns it should have and what fields the individual columns should be mapped to.
For each database there is a default proposition as to what data could be imported and in what way individual values should be input in the appropriate fields. If you are not satisfied with this proposition, you can edit the import formula.
When you choose a field for mapping that represents a link to another database record, you can specify according to which field of this other record the referenced record should be looked up. If it is a record from the same database and it is to be looked up not in the database but in the file to be imported, tick the appropriate checkbox.
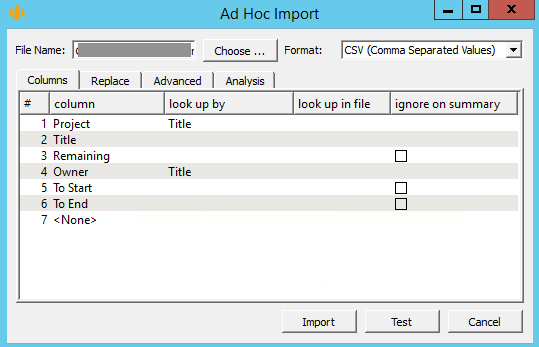
If the field is of the Attachment type you can import attachments into it. The system expects the corresponding column of the import file to specify the name of the file from which the attachment is read.
One of the options you can select in the “Lookup by field" is the "Outline Level". This option is available in case of task imports for the Parent field. Selecting this option means that the application will expect a number of the outline level in this field while the parent will be the closest preceding task with a lower outline level.
Let us take as an example an import of tasks where some tasks in the import file represent at the same time predecessors of other tasks in this file while the predecessor is identified in the file by the task name. To make sure that the tasks are imported correctly, including their mutual dependencies, it is necessary to define for the Predecessors field that the Predecessor field will be looked up by Title and that this Title should be looked up in the import file. If the “Lookup in File” checkbox was not ticked, the application would attempt to look up the predecessor by its title in the database where the particular task has not been created yet; the predecessor-successor relation would thus be created incorrectly.
You can specify for selected fields that the field value should be ignored in case of records with descendants in the import file. In case of tasks this might apply to the fields of To Start and To End where the values depend on the descendants and there is no need therefore to import them.
The order of columns can be changed by simply dragging them with the mouse.
Defaults
If you wish that all the imported records contain a specific value in a specific field, define the appropriate default field values in the Defaults tab.
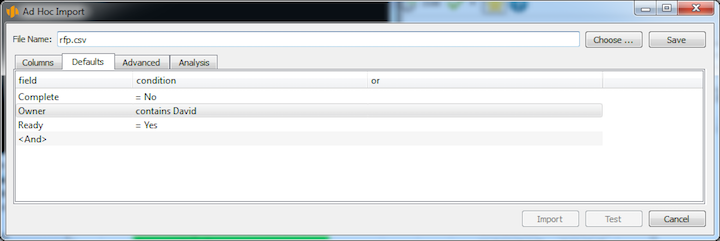
If you import a list of tasks, for example, you can denote all the imported tasks as not completed and you can assign the same owner to all of them.
Advanced
In the Advanced tab you can specify how Instant Team should interpret the import file.
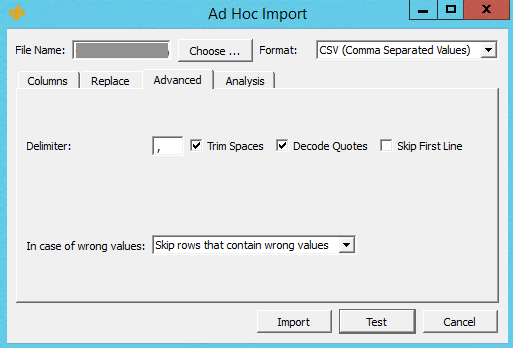
One can define here what character should be treated by the application as the field delimiter, whether space characters in the beginning and end of the imported values should be viewed as part of these values or not, in what way quotation marks should be interpreted in imported texts and whether the first line of the import file should be skipped during import, because it does not contain actual record data but column headings, for example.
In addition, you can specify in the Advanced tab how to treat a file which contains invalid data. Rows with invalid data can be either skipped or the invalid data can be replaced with the default values.
Analysis
The import file is automatically analyzed and compared with the import formula in the Analysis tab. All the import file rows are displayed here and you can browse through them. If for any reason the selected file or any of its data does not comply with the import formula (the number of columns or their content might be wrong, for example), the particular data will be printed in red. If you hover your mouse over it, you will learn the cause of the problem.
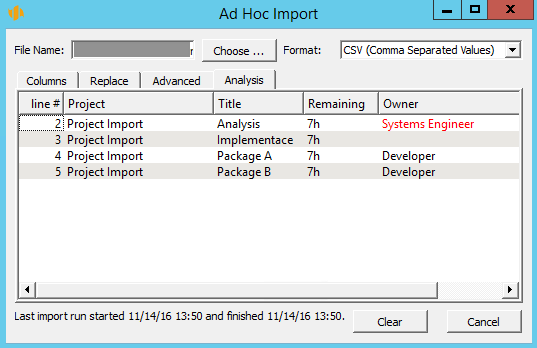
If you only want to test the import without actually writing any data to the server, select the Test button. The application will only check whether the individual import file rows are valid and if not, the invalid rows will be displayed. By pressing the Import button the data will be imported and the results of the last import will be displayed in the bottom part of the import window. If the import contained invalid rows, they are listed in the Analysis tab. The Clear button will appear in the bottom part of the import dialog window enabling to clear the information about import errors (if there were any) and to start a new import.
60 days overview of all dates, capacities, inputs and outputs about each project and completely free.
All rights reserved, Created by eBRÁNA Privacy statement